Web Page Interactive Button
The purpose of this article is to continue building our knowledge from where we left off by adding some visible interaction. We will learn how to divide the code languages more, and get to do some more advanced JavaScript.
Where we left off
When we left off last time, we had the code as seen below in our index.html file, and we were able to click the Go Live button to make live changes. Let us start by going live again, so that we may see changes as they happen.
1<!DOCTYPE html>
2<html>
3 <head>
4 <title>My first page</title>
5 <style>
6 body,
7 body * {
8 margin: 0px;
9 }
10 div {
11 background-color: black;
12 color: white;
13 }
14 ul {
15 background-color: purple;
16 color: yellow;
17 }
18 h1 {
19 color: lightgreen;
20 }
21 h2 {
22 border-color: red;
23 border-style: solid;
24 border-width: 3px;
25 }
26 </style>
27 <script>
28 console.log('abc')
29 </script>
30 </head>
31 <body>
32 <div>
33 <h1>My first Title</h1>
34 <p>My first random paragraph</p>
35 </div>
36 <div>
37 <h2>Bullet List Header</h2>
38 <ul>
39 <li>First</li>
40 <li>Second</li>TYPE
41 <li>Indent One</li>
42 <li>Indent Two</li>
43 </ol>
44 </ul>
45 </div>
46 </body>
47</html>
48
Quick Tip - Automatic Formatting
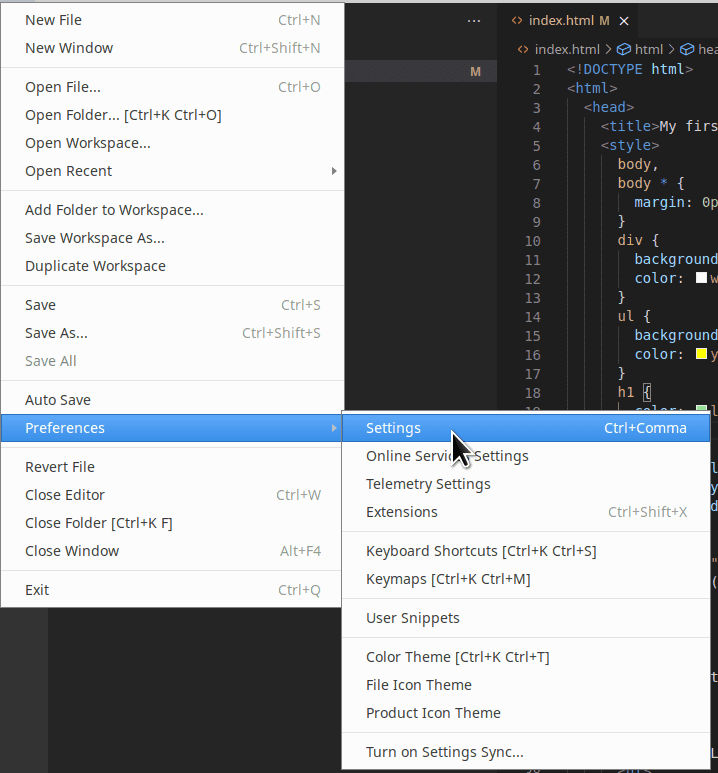
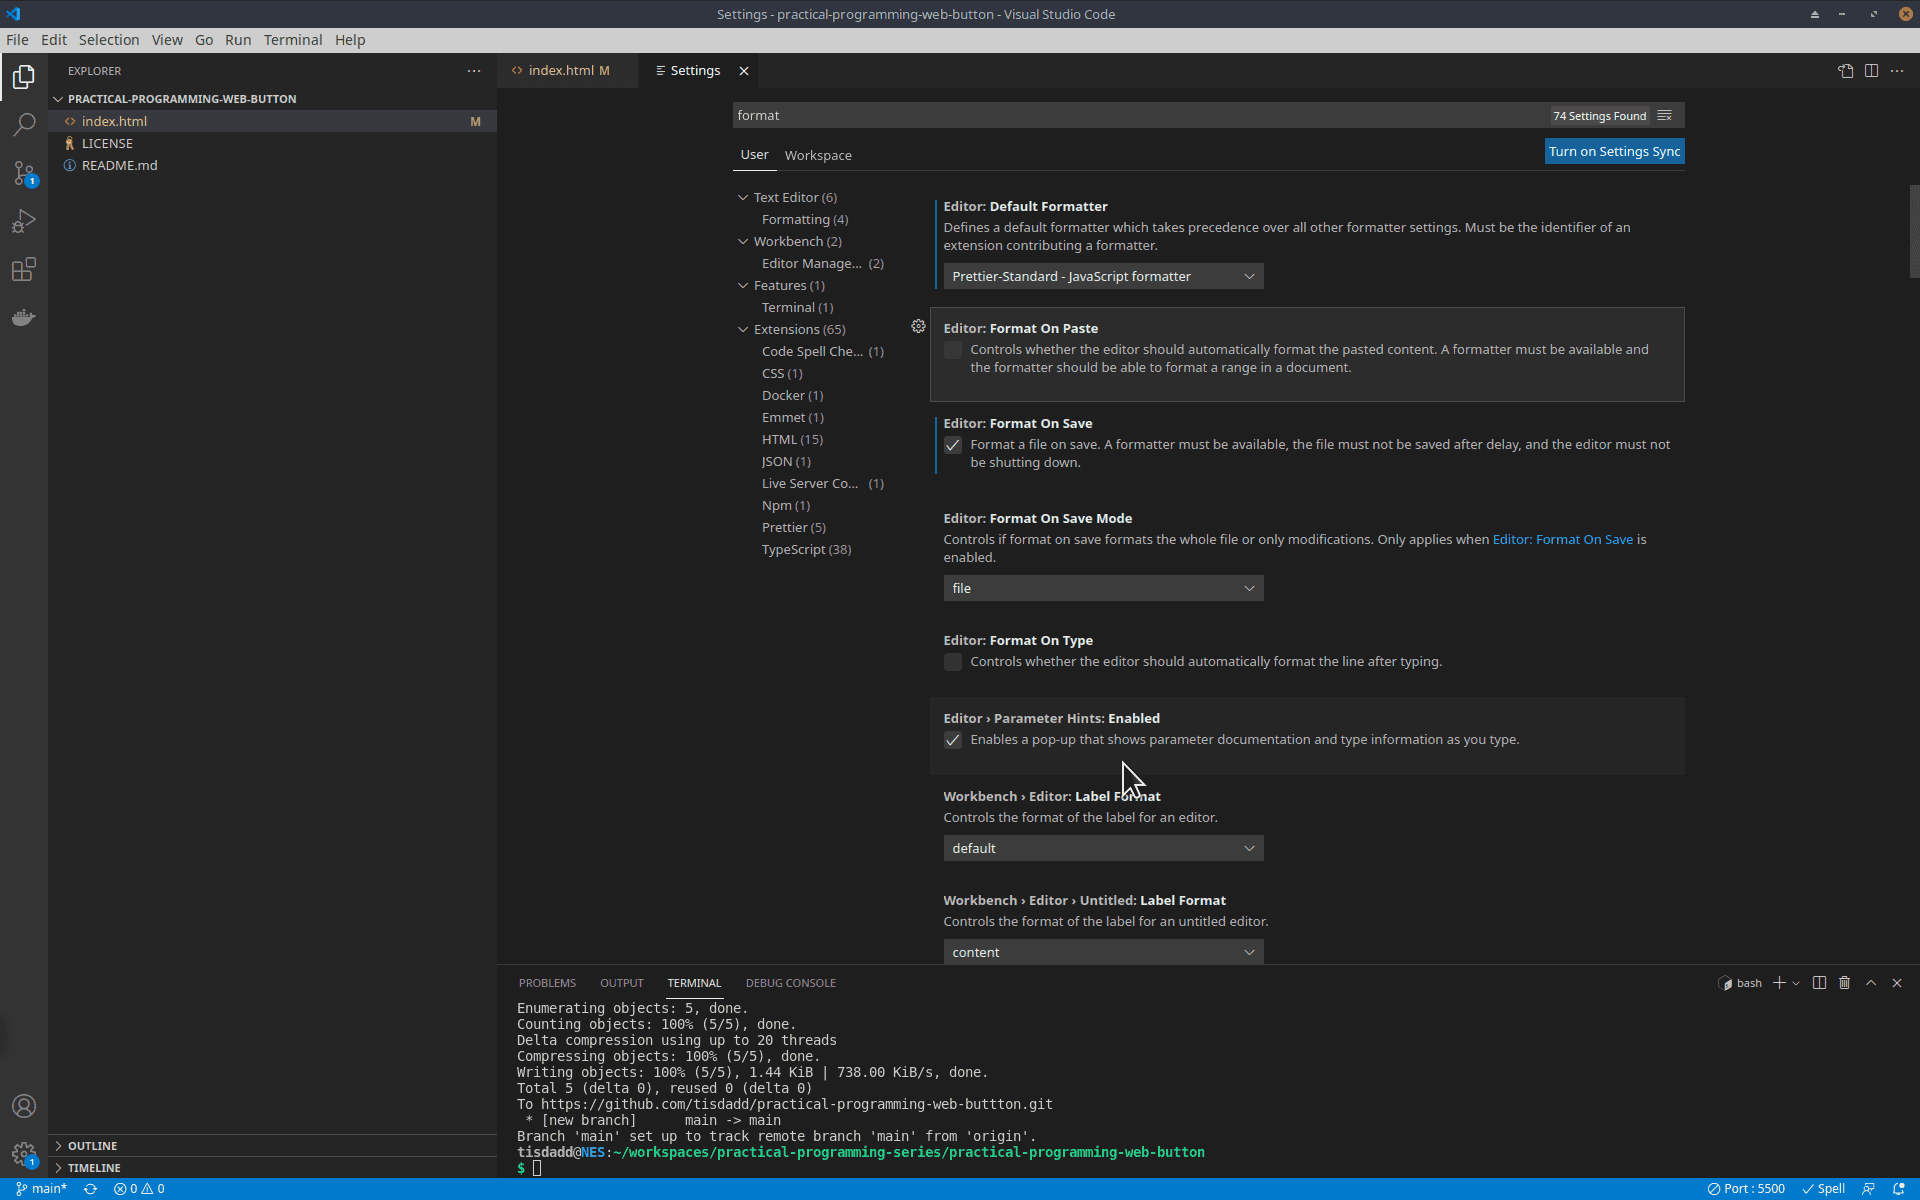
If you are getting tired of manually adding spaces in right now, you can add the Visual Studio Code Extension Prettier-Standard - JavaScript Formatter by numso to match my styling when you save the file. After searching and installing (remember, to bring up extensions is the stack of boxes icon), you may right click and Click Format Document With, then select Prettier-Standard - Javascript formatter. Next, from the menu, do File->Preferences->Settings or the shortcut Ctrl+,. Search for format, and change the Editor: Default Formatter (if you want all files formatted the same way right now) as well as checking Editor: Format on Save.


Separating our CSS
As we have seen, our style tag can start to take up a lot of space, and so having it in another file is useful. To do so, we will create new file called main.css, and copy the contents of the style tag into it, then remove the style tag and replace it with <link rel="stylesheet" href="main.css" /> Javascript Our head tag should now look like the following.
1<head>
2 <title>My first page</title>
3 <link rel="stylesheet" href="main.css" />
4 <script type="text/javascript">
5 console.log('abc')
6 </script>
7</head>
8
We should also have a file called main.css that has the following content.
1body, 2body * { 3 margin: 0px; 4} 5div { 6 background-color: black; 7 color: white; 8} 9ul { 10 background-color: purple; 11 color: yellow; 12} 13h1 { 14 color: lightgreen; 15} 16h2 { 17 border-color: red; 18 border-style: solid; 19 border-width: 3px; 20} 21
Our page should look identical to what it did before.
Adding a Button
We will now add a button to the page, at the bottom right before the closing </body> tag.
1<button type="button">This Button Has Not Been Clicked</button> 2
Some New HTML Tag Information
Attributes
At this point, the button will not do anything but be on the page, and you may be wondering about some of the tag's looking a bit different. In the link and button tags, rather than simply have the tag name, we have started to introduce attributes. Each attribute works with a tag for enhancing its use or providing extra information, and can have different values. An attribute must be in the opening tag, and is usually of the form attribute_name="attribute_value. To find out more details about any tags and attributes earlier than this series teaches you may check the w3 Schools HTML Reference, the Mozilla Developer Documents or the w3 specifications.
1<!-- The rel attribute tells the browser the relationship of what we are linking to, while the href attribute tells where it is in relation to the page -->
2<link rel="stylesheet" href="main.css" />
3
4<!-- The type attribute used here is used to specify what type of button this is - it can be a "button", "reset" or "submit" type with the last two types being used for forms -->
5<button type="button">This Button Has Not Been Clicked</button>
6
Self Closing Tags and Comments
You may also be wondering why the link tag is ending with /> and does not seem to have a closing tag. This is because it is a tag without any text content, so we can combine both the start and end and let the browser know by doing the /> at the end. As such, it is known as a self-closing tag.
You may notice in the code snippet above that there is something that looks like the tags we have used, but clearly is not adding functionality but instead explaining something. This is called a comment, and is used to help navigate code or explain something to others including your future self. In HTML, this is done through a special tag that starts with <-- and ends with -->. In Visual Studio Code you may use the shortcut Ctrl+/ to comment almost anything.
Making the Button Do Something
Now that we have a button, most likely we would like something to happen when it is clicked. In order for that to happen, we need to call a function in JavaScript. Please add the following to your script tag.
1// clickedTimes is to keep track of how many times the button has been clicked
2let clickedTimes = 0
3/**
4 * This function is meant to be called on the click of the button.
5 *
6 * It serves as an example function to show a few things.
7 */
8function onButtonClick () {
9// increment the times clicked by one, as it was just clicked
10clickedTimes = clickedTimes + 1
11
12// grab all of the buttons on the page
13const buttons = document.getElementsByTagName('button')
14
15// get just the inner button
16const button = buttons[0]
17
18// change the button text
19button.innerText = `Clicked ${clickedTimes} times!`
20
21// get some items using a different way
22const listItems = document.querySelectorAll('li:nth-child(2)')
23
24// iterate through each of the items selected
25listItems.forEach(listItem => {
26 // check if the color of the text is red
27 if(listItem.style.color === 'red')
28 {
29 // make the text of the color blue
30 listItem.style.color='blue'
31 }
32 else {
33 // make the text color red for that item
34 listItem.style.color = 'red'
35 }
36})
37
There is a lot going on here - including two ways of creating comments in JavaScript. If the button is clicked, nothing happens still. To make the stuff happen, please add the attribute onclick with the value onButtonClick to make the button code now be the following.
1<button type="button" onclick="onButtonClick()"> 2 This Button Has Not Been Clicked 3</button> 4
Now the button will change text, and the second li tag in each list will swap color to red and blue when clicking.
Comments in JavaScript
Single line comments in JavaScript are everything on a line after //. This allows doing a short comment or something at the end of a line depending upon your style. For a longer comment spanning multiple lines, or if for some reason you want one in the middle of a line, start it with /* and end it with */.
Separating our JavaScript.
At this point, since we have added some new things to play with, we should push to GitHub again. Then we should separate our JavaScript code in a manner similar to the CSS. First, make a new file called main.js and copy the script tag contents into it. Next, remove the script contents and give the opening script tag the attribute srcwith value main.js - the script tag is not allowed to be self-closing. Your page should still act the same as it was before the change when you are done. Once that is done, push to GitHub again.
Files after separation
Our files after separation should look like the following.
1<!-- index.html -->
2<!DOCTYPE html>
3<html>
4 <head>
5 <title>My first page</title>
6 <link rel="stylesheet" href="main.css" />
7 <script src="main.js"></script>
8 </head>
9 <body>
10 <div>
11 <h1>My first Title</h1>
12 <p>My first random paragraph</p>
13 </div>
14 <div>
15 <h2>Bullet List Header</h2>
16 <ul>
17 <li>First</li>
18 <li>Second</li>
19 <ol>
20 <li>Indent One</li>
21 <li>Indent Two</li>
22 </ol>
23 </ul>
24 </div>
25 <button type="button" onclick="onButtonClick()">
26 This Button Has Not Been Clicked
27 </button>
28 </body>
29</html>
30
1// main.js
2console.log('abc')
3
4// clickedTimes is to keep track of how many times the button has been clicked
5let clickedTimes = 0
6/**
7 * This function is meant to be called on the click of the button.
8 *
9 * It serves as an example function to show a few things.
10 */
11function onButtonClick () {
12 // increment the times clicked by one, as it was just clicked
13 clickedTimes = clickedTimes + 1
14
15 // grab all of the buttons on the page
16 const buttons = document.getElementsByTagName('button')
17
18 // get just the inner button
19 const button = buttons[0]
20
21 // change the button text
22 button.innerText = `Clicked ${clickedTimes} times!`
23
24 // get some items using a different way
25 const listItems = document.querySelectorAll('li:nth-child(2)')
26
27 // iterate through each of the items selected
28 listItems.forEach(listItem => {
29 // check if the color of the text is red
30 if (listItem.style.color === 'red') {
31 // make the text of the color blue
32 listItem.style.color = 'blue'
33 } else {
34 // make the text color red for that item
35 listItem.style.color = 'red'
36 }
37 })
38}
39
40
Conclusion
In this lesson, we have separated the HTML, CSS and JavaScript as well as learned a little about comments. In addition, we have created a button and called our first custom function using it. Also, we have learned about attributes in HTML. You may view the current code on GitHub or StackBlitz
Next - Web Button Code Investigation Start
Prior - An Introduction to Displaying Web Pages - Part 2
Tags: Practical Programming, Introduction, JavaScript, Button, Interactive